![]() Find a Distributor
Find a Distributor
![]() Contact Us
Contact Us
![]() Like us on Facebook
Like us on Facebook
![]() Follow on Twitter
Follow on Twitter
![]() Connect on LinkedIn
Connect on LinkedIn
![]() Follow on Instagram
Follow on Instagram
![]() Subscribe on Youtube
Subscribe on Youtube
MENU
The secret to stripping paint is patience and the right paint stripper. Stripper Cream has three main uses:
As a multilayer paint remover, it is designed to sit on the surface for an extended period without drying and soften numerous layers of paint.

The brick pictured here is from a historical building that was once a train station. All the layers of paint, including the thick milk paint layer closest to the surface, were stripped with one application of Stripper Cream that was left to sit overnight. The cleaned surface was rinsed with low pressure in a sink.
It is especially important to apply the stripper heavily enough to dissolve all layers of paint. The most expensive elements of paint stripping are the application and commonly, the repeated rinse down.
Learning a few simple techniques for simplifying the process can turn paint stripping from a nightmare job to one both manageable and profitable.
The first area of concentration is the style of application. Apply the paint stripper in to out and down to up. When using Stripper Cream, we strongly recommend that you always use a high solvent roller. You can find the rollers at professional paint stores. They stand up to the stripper without unrolling or delaminating and are not much more expensive than a regular roller. A cheap roller can waste time and product, which ends up wasting money. A small investment here can help you save in the long run.
Dip half the roller in Stripper Cream and roll up the wall, spreading the product out. Remember, this is not paint and you do not want it spread thinly. A thick coat is better as it leaves adequate caustic in an area to get through multiple layers. The Stripper Cream will work more quickly in warmer temperatures, but many historical jobs with thick paint have been completed in the dead of winter. We advise users not clean when temperatures are below freezing or will be overnight. If freezing conditions do exist, allow adequate time for the surface to thaw before applying.
We do recommend covering anything that may be immediately harmed by undiluted stripper during application. If the stripper does come into contact with a sensitive surface, especially a person, wipe it off with a dry cloth, spray on vinegar and then rinse with water.
Do not add water first or use a damp cloth, as water will activate the stripper.
Do not get the stripper on the grass or plants during application. They will not be killed, but they will brown.
Make sure a heavy concentration of the stripper is placed under the eaves, windowsills or on porch areas where the paint has been sheltered from the weather. These areas always take a little more work and a heavy coat of stripper will cut down the effort necessary. An overall browning of the paint is a sign to begin a scratch test. Use a putty knife or screwdriver to test the paint. If everywhere you scratch you see substrate(what’s under the paint), you are ready to rinse.


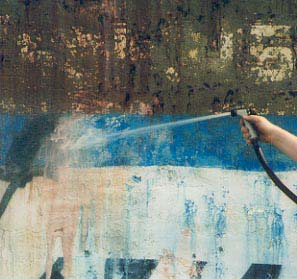
To start rinsing, you can use a pressure washer or a garden hose. It isn’t necessary to spend a lot of time on the initial rinse. Its purpose is to reactivate the caustic and quickly remove all the totally softened paint. In most multilayer stripping jobs, there are areas that just to not release immediately. Exposing the areas quickly means you aren’t reapplying needlessly.
Start rinsing at the top and work down. After you have pre-rinsed a five to eight foot section, quickly apply another application of the Stripper Cream, diluted 4:1 (four parts water to one part stripper). Allow the application to sit on the surface as you proceed down the wall. A well soaked wall activates the liquid stripper for a more effective clean.After working your way down the wall, return to the top with the pressure washer and test to see if the wall is ready for final rinse.
You should see 99.8% release when you pressure wash. If you don’t see this, lightly rewet and work on the next section. Any section, such as under eaves, that is highly resistant to stripping should just be recoated with the undiluted stripper. A lot of caustic can be sucked into the unpainted masonry which, especially in historic jobs, can be very porous. Normally, these jobs will need to be re-pointed. You can remove the resulting caustic efflorescence after pointing by using NMD 80 diluted 4:1 (four parts water to one part solution). If pointing is unnecessary, allow the wall a few days to thoroughly dry and clean it all with NMD 80.